Capability overview
How can I use deterministic native export in Screen Studio Kit?
Export finished screenshots as PNG or JPEG with organised filenames and export history. Preview and validate the selected output first; Pro adds batch export across sizes and languages.
Build a screenshot gallery that shows buyers what your app does. Place screenshots in device frames, write clear headlines, and adjust the composition for each output size. Start with three free templates or unlock all 26 with Pro.
Choose outputs
Pick sizes, languages and packaging
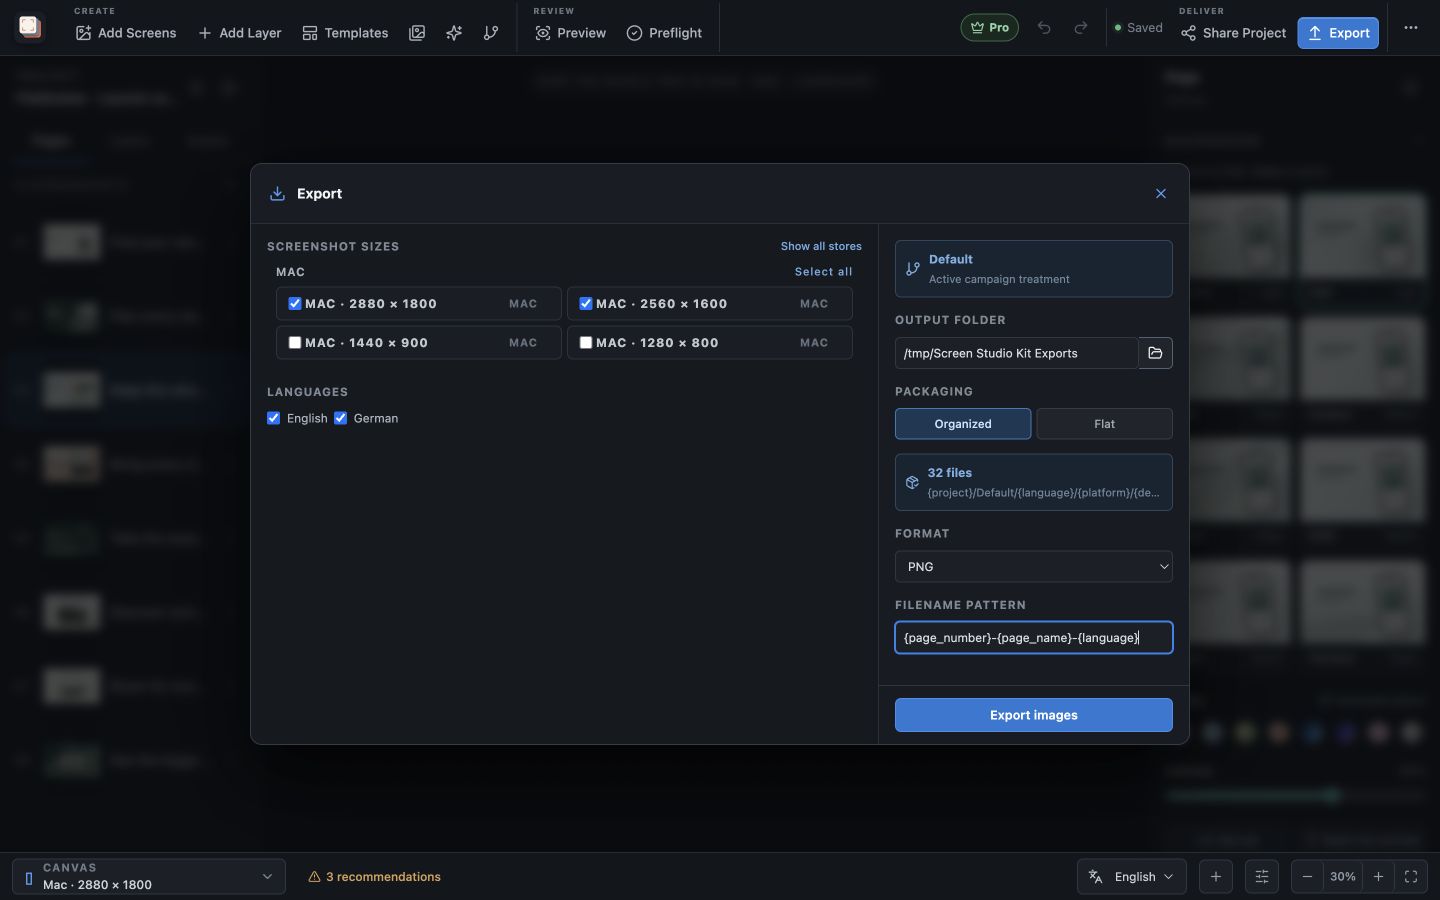
The Export panel groups Screenshot sizes by store, with Select all for each group and Show all stores for presets outside the project's chosen stores. Promotional assets, such as feature graphics and event cards, are listed separately and export only the page assigned to them. Under Languages, tick the languages to include.
The sidebar shows the Active campaign treatment, Output folder, Packaging, Format and Filename pattern, plus a count of the files the export will write. Organized packaging creates project, treatment, language, platform and device folders; Flat puts every file in a single treatment folder.
The file count is the number of pages shown at each size, multiplied by the number of languages. Pages marked Exclude from export in the Pages sidebar are skipped. In the Mac App Store build, choose the Output folder again after relaunching the app, because the sandbox does not keep access to it.
File names
Name files the way your release process expects
The default Filename pattern is {page_number}-{page_name}-{language}-{device_family}-{width}x{height}, and {project} and {platform} are available as well. Page numbers use two digits, so the files sort in page order.
If two files would get the same name, the second receives a number suffix instead of overwriting the first. Each image is written under a temporary name and renamed when it is complete; cancelling keeps the finished images and removes the unfinished ones.
Formats and checks
PNG or JPEG at the exact store size
Every image is rendered at its preset's exact pixel size as PNG or JPEG with an opaque background, because none of the store presets accept transparent screenshots. Microsoft Store presets accept PNG only, and the panel blocks a JPEG export that includes them.
Export images stays disabled while Preflight reports errors, and each error appears as a Fix in editor link that opens the affected page and layer; warnings, such as a capture that may look soft at a size, are shown but do not block.
After export
Check what was written
A completed export writes an export-summary.json file listing the languages, sizes, page count and every file, and Reveal opens the folder. Recent exports shows the last three runs with their date, page count and status.
Open the folder and check a few images from each size and language before uploading. If something is wrong, fix it in the project and export again rather than editing the exported files, so the next release starts from the corrected design.
Cmd/Ctrl+E opens the Export panel from anywhere in the editor. Free exports one size and one language per export and up to 10 images per local day, and the panel shows how many free images are left today. Pro exports every selected size and language in one batch with no daily cap.
In the workflow
How to use it
Resolve Preflight errors
Open Preflight and fix every error; review warnings in context.
Select sizes and languages
Tick the screenshot sizes, promotional assets and languages for this release.
Set folder, format and names
Choose the Output folder, Organized or Flat packaging, PNG or JPEG, and a Filename pattern.
Export and inspect
Choose Export images, then open the folder with Reveal and check the files against export-summary.json.
Useful in practice
When to use it
Related manual
Exporting and publishing store screenshots
Check your screenshots before export, review the finished files, and publish approved screenshots to a store with Pro.
Read the guideDirect answers
Questions about deterministic native export.
Which file formats can I export?
PNG and JPEG. Microsoft Store presets accept PNG only.
Can exported screenshots have a transparent background?
No. Exports are opaque, because the store presets do not accept transparent screenshots.
What happens if I cancel an export?
Images that were already finished are kept and unfinished temporary files are removed.
How many images can I export in Free?
Up to 10 images per local day, at one size and one language per export. Pro removes the daily cap and exports several sizes and languages together.